

User Guide
AutoFund Accounting · fund accounting on QuickBooks
Using AutoFund month to month
Last updated October 2026
1. The dashboard
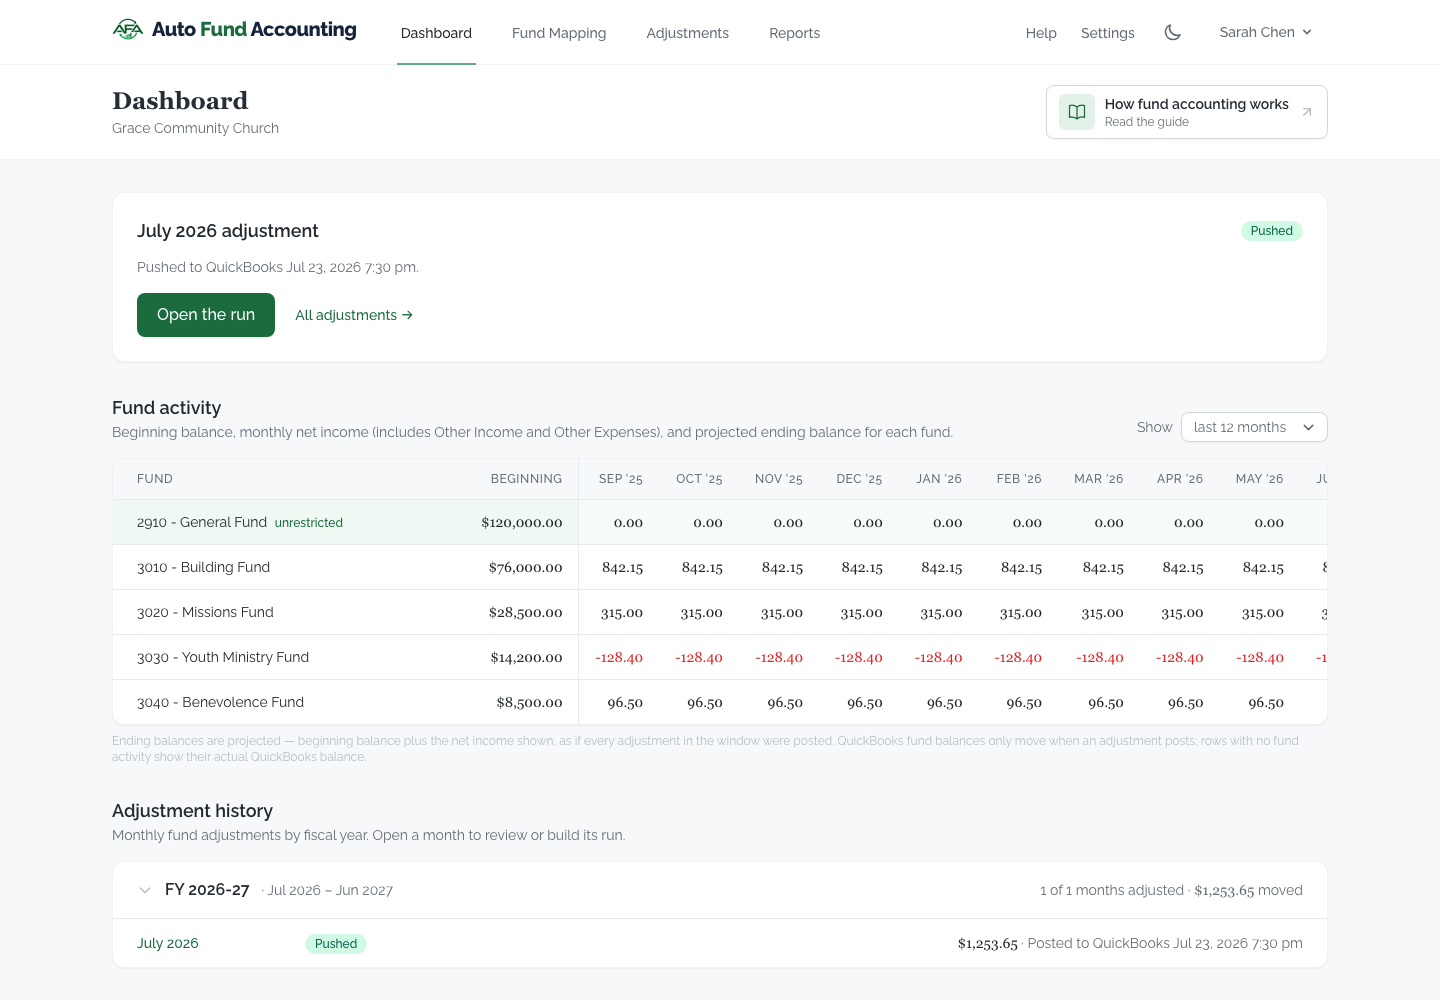
The dashboard is your at-a-glance view of every fund. The fund-activity matrix lists each fund down the side and recent months across the top, so you can see how each fund moved over the year.
Reading the matrix
- Beginning balance — where each fund stood at the start of the window.
- Monthly columns — each fund's net activity that month.
- Ending balance — the projected balance after the activity shown.
- Use the "Show" selector to widen or narrow how many months appear; beginning and ending balances move with it.
Posted months
A month whose adjustment has been posted to QuickBooks carries a blue "Pushed to QuickBooks" label with a check mark, both on this month's adjustment card and in the fiscal-year history below it, next to the date it was posted. Blue is kept for posted months only, so they stand out from everything else on the page.
Drill down
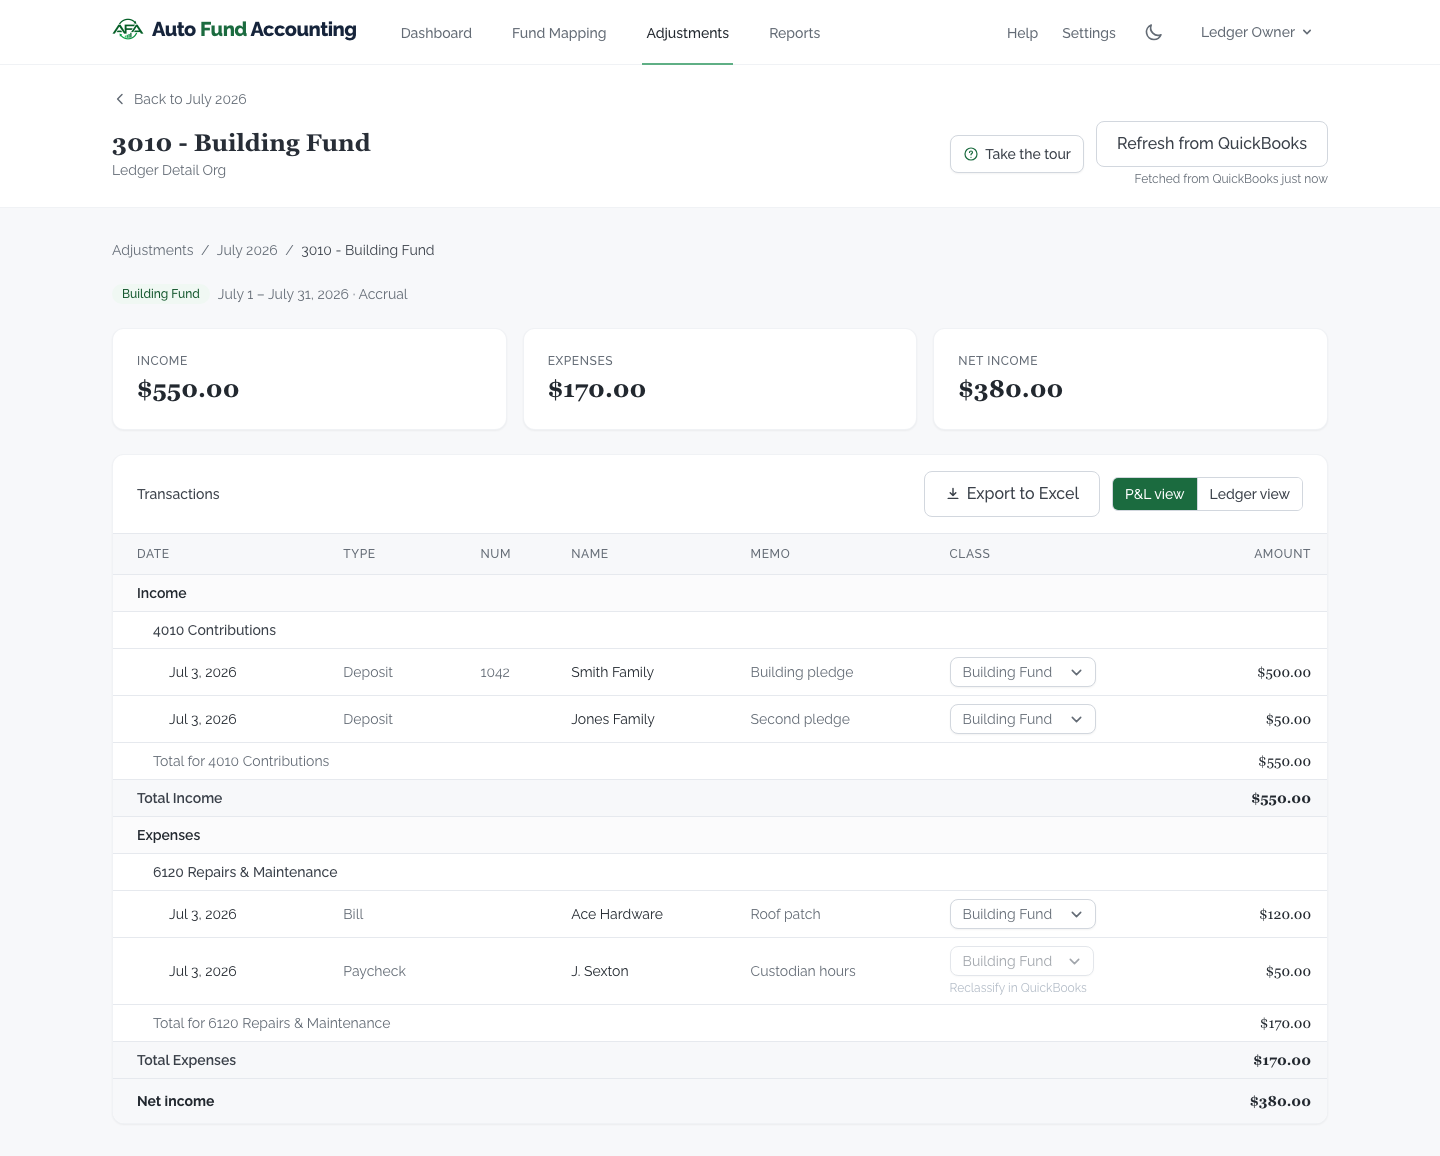
Click any fund to open its sub-ledger — the individual transactions behind a month's figure, straight from QuickBooks.
2. Structuring your funds
Before mapping anything, it helps to know what a correct structure looks like. These are the rules your fund mapping should satisfy — AutoFund checks the ones it can see and warns you right in the mapping editor (a class shared by two funds, a class on your General Fund, a fund left without a class), but your chart of accounts and classes are yours to set up in QuickBooks.
R1 — Map each fund's activity class to its net asset balance account
When mapping a class, map the class that tracks each individual restricted fund's activity to that fund's net asset balance account on the balance sheet.
R2 — One class per fund, always
There must be a separate class for each and every fund. A Cemetery fund requires a Cemetery class tracking all cemetery activity; a Capital Improvement fund requires a Capital Improvement class.
R3 — Designated funds follow the same rules as restricted funds
Restricted means the donor imposed the restriction; designated means your finance council or governing board (a parish finance council, for example) set money aside for a purpose. Each designated fund needs its own class tracking its activity, exactly like a restricted fund.
R4 — Unrestricted funds need no adjustment
Anything not restricted or designated does not need its fund balance adjusted. QuickBooks, Online and Desktop alike, closes it into retained earnings and the general fund by default.
R5 — Never assign a class to unrestricted fund net assets
Do not assign a class to unrestricted fund net assets or fund balances. Unrestricted activity closes naturally to retained earnings and the general fund, and mapping it would double-count.
The next section covers the mechanics — where the mapping editor lives, who can change it, and what happens when you do.
3. Editing your fund mapping
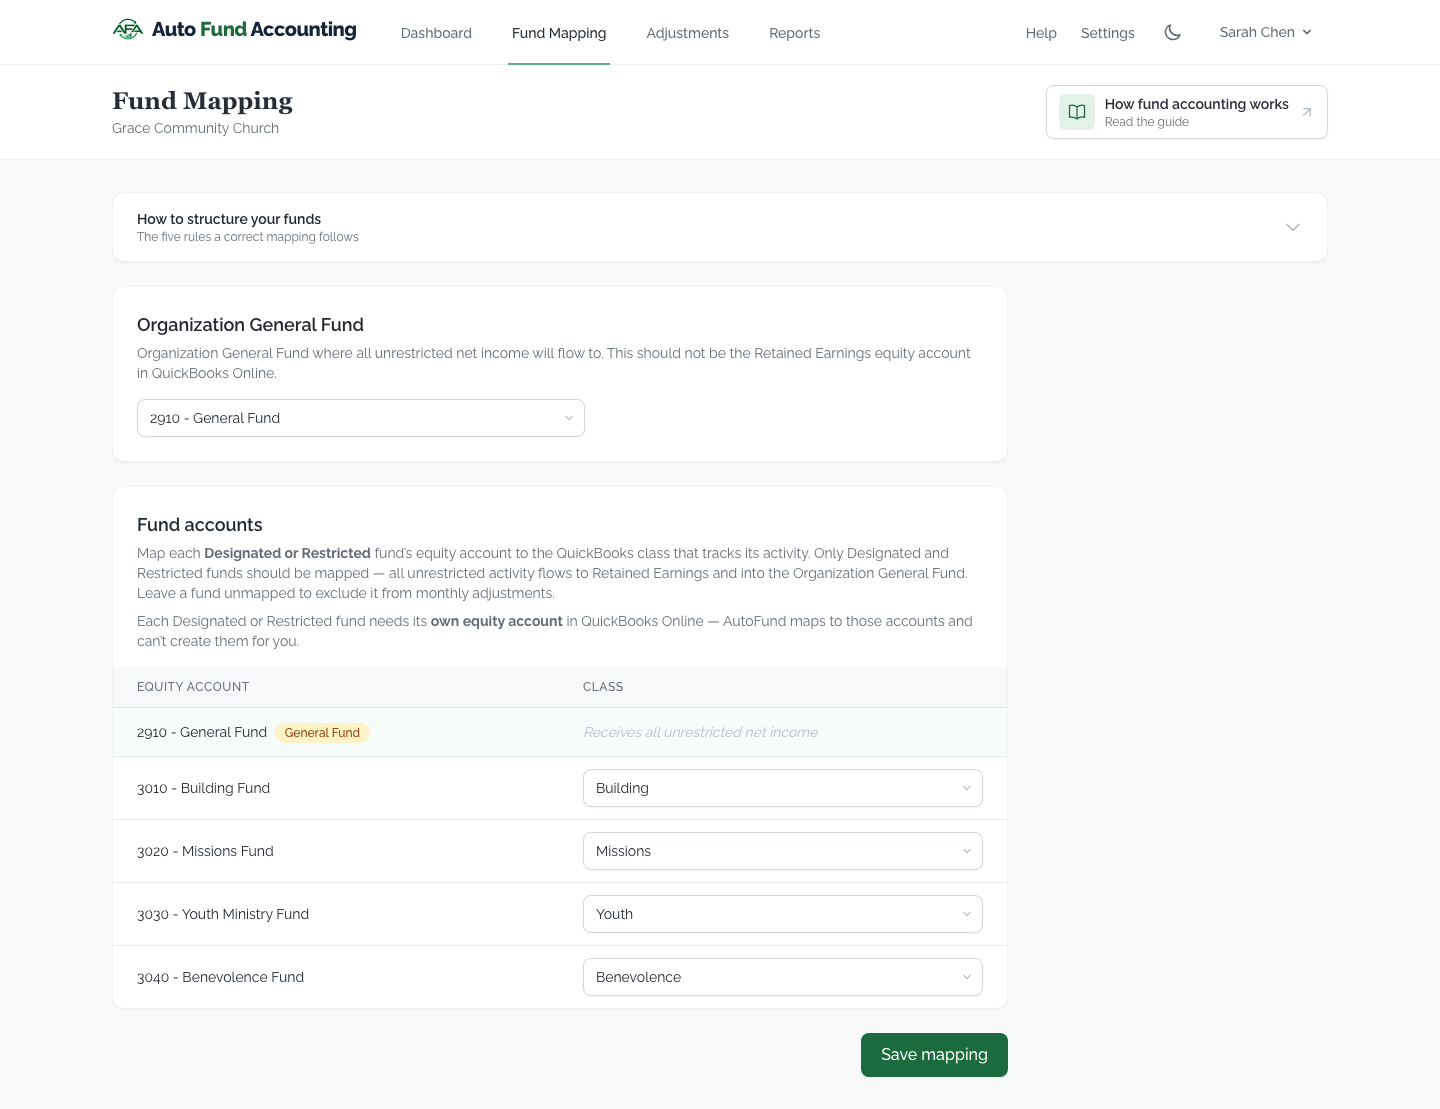
Your fund mapping tells AutoFund which QuickBooks class belongs to which fund-balance equity account. You set it during onboarding, and you can edit it any time from the Fund Mapping tab Administrator or Supervisor. For what a correct mapping looks like — which funds need a class, and which must not have one — see Structuring your funds.
What the mapping needs in QuickBooks
Every Designated or Restricted fund needs its own equity account in your chart of accounts, alongside the class that tracks its activity. That account is what each month's adjustment moves the fund's net income into — without one, there is nothing for the class to be mapped to, and setup can't be finished. AutoFund maps to those accounts; it can't create them, so add any missing ones in QuickBooks and they appear here after your next chart sync.
The equalizer account
One account is your equalizer — usually your general or unrestricted fund. Each month's adjustment moves every restricted fund's activity out of the equalizer and into that fund, so the equalizer is where the "leftover" general activity naturally stays. You choose it here.
Unmapped funds
Any class you haven't mapped to an equity account simply isn't adjusted — its activity stays in the general fund until you map it. Map a new fund by matching its class to its equity account and saving; the change takes effect on your next adjustment.
4. Your monthly adjustments
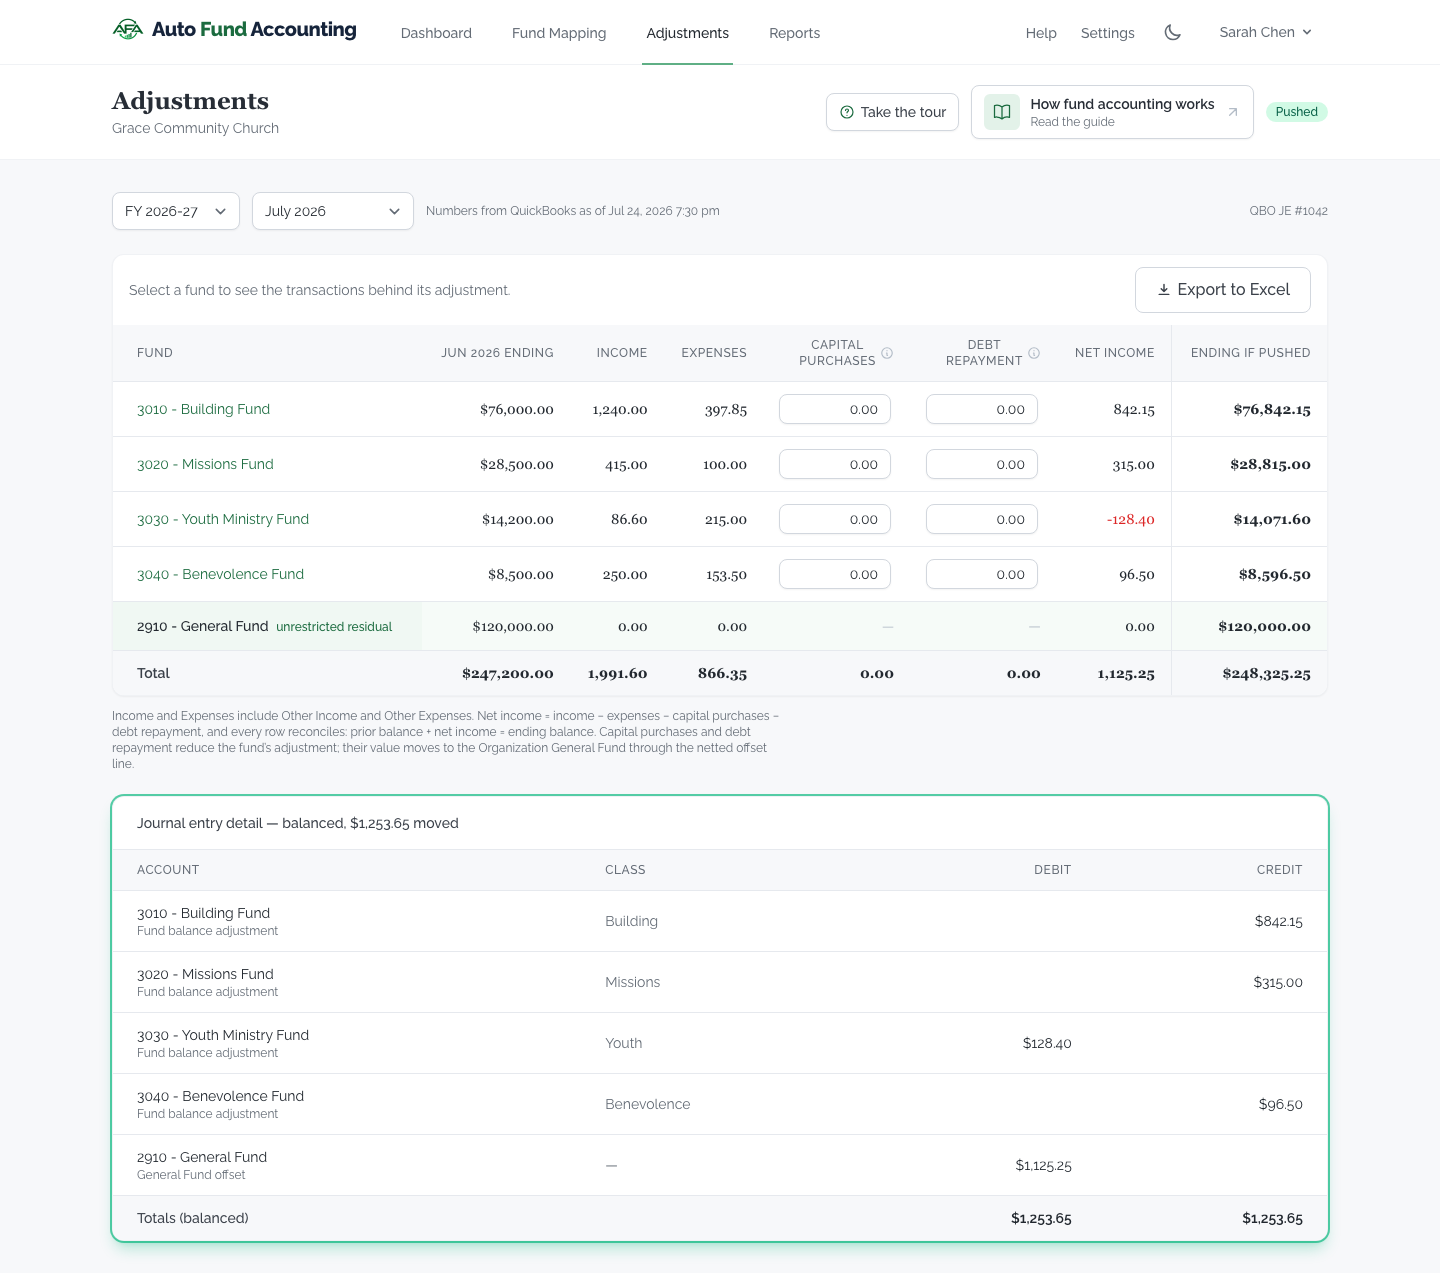
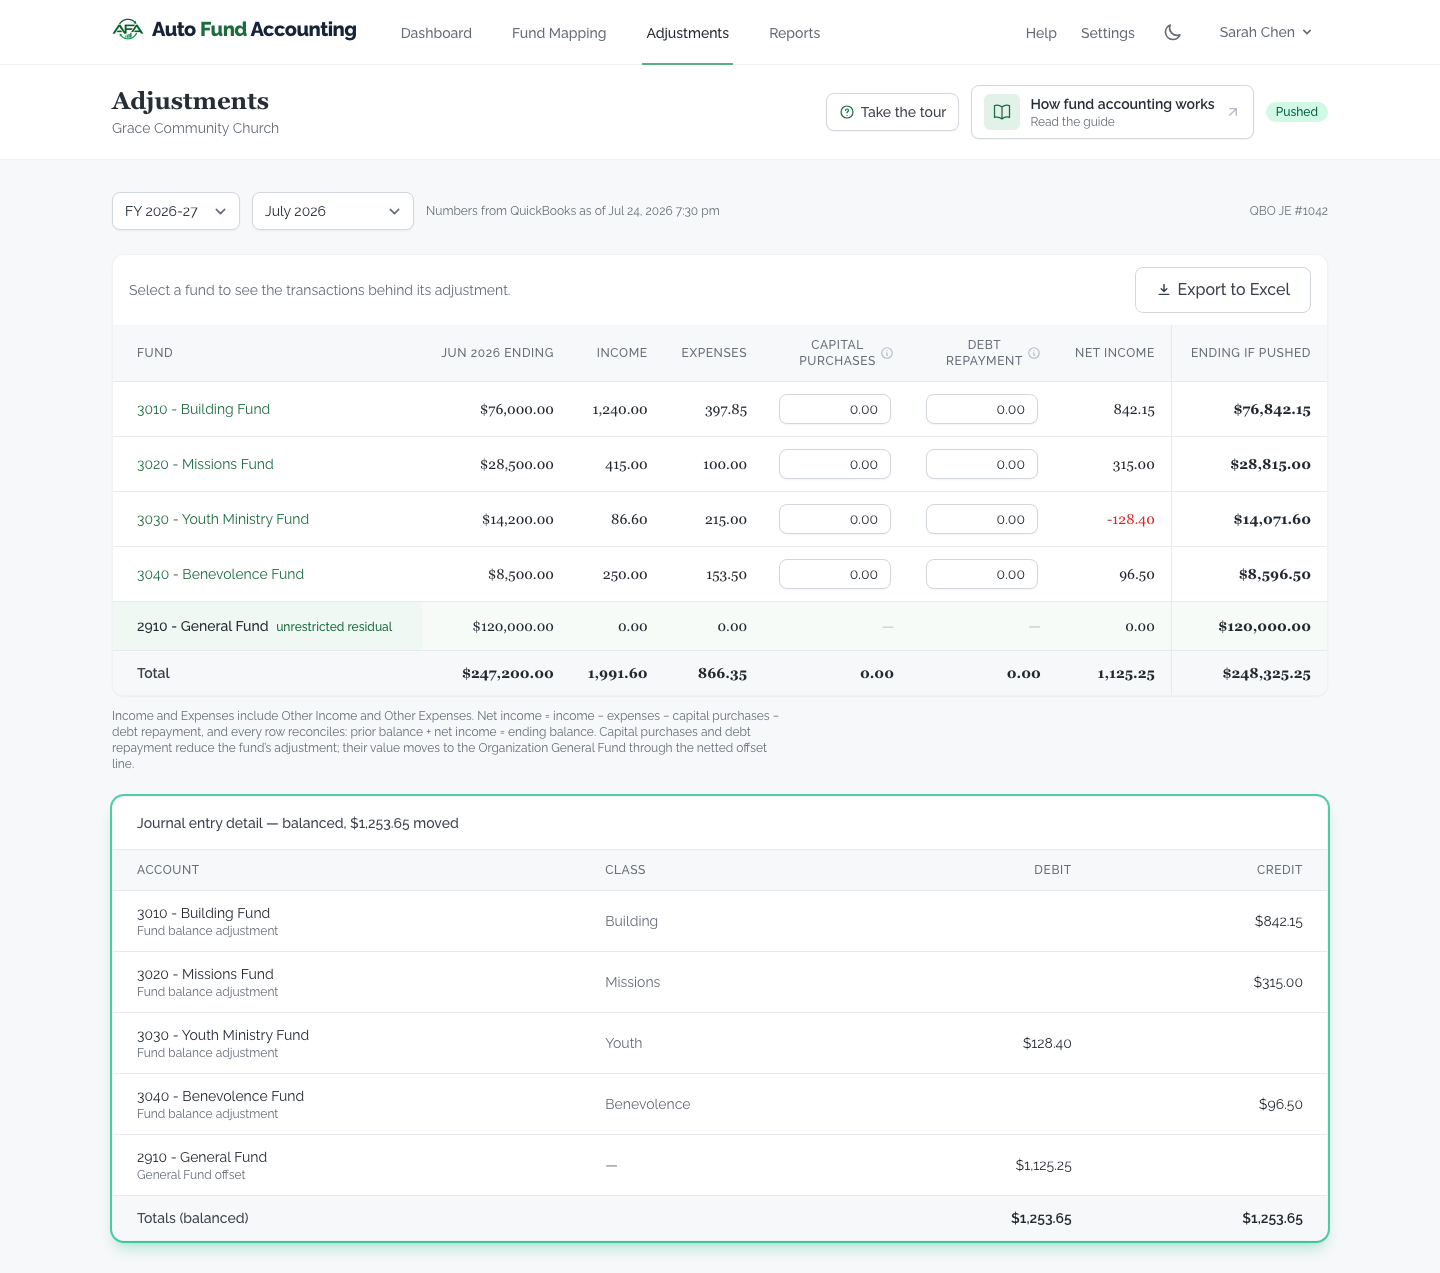
The Adjustments tab is where AutoFund earns its keep. Each month you build one balanced journal entry that moves every fund's net activity into its own equity account, review it, and post it to QuickBooks.
Building a run
Pick the month and AutoFund pulls your Profit & Loss by class and lays out, fund by fund, how each one reconciles:
ending balance = prior-month ending + net income
Capital purchases & debt repayment
Two optional inputs let you move cash transfers that don't show up in the P&L: Debt repayment (principal a fund paid down) and, for organizations that depreciate, Capital purchases (fixed assets a fund bought). Enter a figure and the entry moves that amount with the fund.
Prior months not adjusted
A bill, deposit or reclass dated into a month you already posted would otherwise stay in your general fund for the rest of the year. AutoFund compares each fund's balance in QuickBooks with what the year's activity says it should be, and shows the difference in the Prior months not adjusted column, counted from the first month you posted this fiscal year. Adjustment = Net income + Prior months not adjusted. The second column is earlier-month activity this fiscal year (a backdated bill or deposit, a reclass, a voided transaction) that no adjustment has moved into the fund yet. It rides on the same journal-entry line. A posting made directly to a fund’s equity account is accepted as your balance, not reversed, once you review it.
The YTD ties column says whether each fund will be right through this month once you post. After a month is posted, AutoFund checks it again every night; if something is later dated back into it, the month shows ⚠ on your dashboard and the next adjustment catches it up.
Preview, post, and drafts
- Preview the journal entry — debits and credits, with the single netted general-fund offset — before anything leaves the app.
- Post to QuickBooks Administrator or Supervisor pushes the entry into your books. AutoFund refuses to post an entry that doesn't balance.
- An entry you haven't posted stays a draft you can revise.
- Export to Excel to download exactly what's on screen for your records.
The action bar
The rebuild, save and post buttons sit together in a bar under the month picker that stays at the top of the window while you scroll. When you type a Capital purchases or Debt repayment amount and haven't saved it yet, Save turns green and says "Unsaved changes", posting waits until you save (it would post the last saved amounts, not what's on screen), and Rebuild asks before it discards what you typed.
Posting a month
When you post, the page stays where it is: the button turns blue with a spinning wheel while QuickBooks records the entry. When it's done, the page reloads once and takes you to the journal entry, which now has a blue border and a blue "Pushed to QuickBooks Successfully" label with the date and time. Blue always means "posted to QuickBooks": the same blue label marks posted months on your dashboard. Red means QuickBooks rejected the entry; the reason is shown above it, and you can fix it and post again.
After a month is posted, the bar offers Back to Dashboard and Next month. If next month hasn't ended yet, the button says when it opens. Your browser's Back button also takes you to the dashboard right after you post. Months that have ended are fetched from QuickBooks ahead of time, so the next one is usually ready the moment you open it.
Administrators and Supervisors can perform this action. Associates have read-only access to these financial controls.
The guided tour
The first time you open an adjustment, a short welcome tour walks the table column by column — where each fund's beginning balance comes from, what Income and Expenses cover, and worked examples for the two amounts above that you enter yourself. It runs once; afterwards the Take the tour button beside the page title replays it whenever you want. It is fully keyboard-operable: Tab cycles the card's buttons and Escape closes it.
5. Fund ledgers & exports
Select a fund on an adjustment run to review its transaction detail. Switch between a grouped P&L view and a date-sorted Ledger view, or export the active view to Excel. Refresh reads the connector again; it does not write.
An amber tie-out message means live detail differs from the run's saved snapshot. Rebuild an unpushed run before posting. Owners may move a supported transaction to another fund Class after accepting the warning; that changes the transaction in QuickBooks and AutoFund cannot undo it. Members remain read-only.
This page carries its own short welcome tour, separate from the adjustment page's: the two views, the freshness stamp, the export, and exactly what the Class dropdown does to your books. It runs on your first visit here and stays available from the Take the tour button beside the page title.
6. Reports
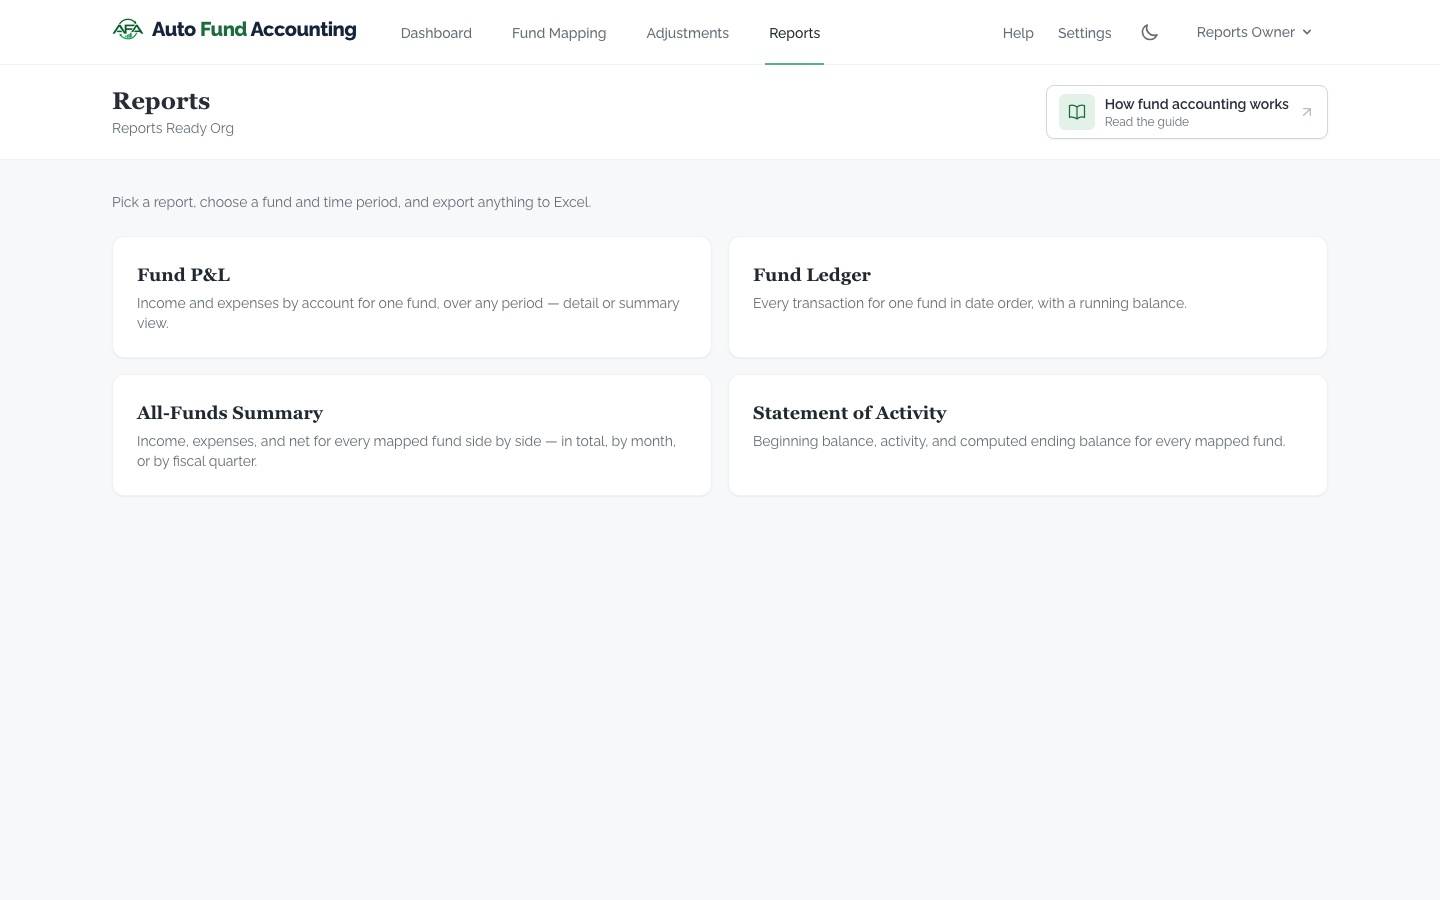
The Reports tab gives you fund-oriented views of your books — for a board packet, an audit, or your own review — reading the same QuickBooks data behind your adjustments.
- Fund Profit & Loss and Fund Ledger for a single fund over a period you choose.
- An All-Funds Summary and a Statement of Activity across every fund.
- Flexible periods — this month, last month, a fiscal quarter or year, or a custom date range.
- Export any report as Excel (.xlsx) or PDF, and save a report's settings to re-run later.
Exporting a report
Run a report, then choose Export and pick Excel (.xlsx) or PDF. Both use the figures already on your screen. The PDF looks the same as a shared report link, so what you send by email and what you share match.
If your organization has a logo (see Settings), the Export menu shows Include organization logo, checked by default. Uncheck it for a plain export.
7. Automation
When your connector supports automated runs, an owner can enable Automation in Settings and choose a day from 1 through 28. Each month AutoFund prepares the prior month's run.
- Hold for review waits for capital-purchase and debt-principal inputs.
- Treat missing inputs as zero lets an otherwise eligible balanced run continue.
8. Roles & access
- Administrator — full access. Administrators do everything a Supervisor does, and additionally manage billing, organization settings, support access, share links, and the setup wizard. Every organization keeps at least one Administrator: the last one can't be removed or stepped down.
- Supervisor — runs the monthly close. Supervisors connect, sync, and disconnect QuickBooks, edit the fund mapping, save inputs, build and rebuild runs, post adjustments, reclassify transactions, save reports, and set the automation schedule for the close they run. They don't touch billing, organization settings, or other people's accounts.
- Associate — the same screens, read-only. Associates view the dashboard, mapping, adjustments, and reports, export anything they can see, refresh a report they're reading, and submit support or feature requests. They change nothing — not the books, not the settings, not a saved report.
Adding and removing people
Administrators invite teammates from the Members page in Settings by email address, choosing the role each person will hold. AutoFund emails the invitation; the recipient opens the link, sets their own name and password, and joins your organization already verified. The link is never shown to you to forward, so no one ever shares a login.
An invitation is single-use and expires seven days after it is sent. Inviting the same address again replaces the previous link, which stops working the moment the new one goes out, and revoking a pending invitation ends it immediately. The same page changes someone's role or removes them, and removal takes effect at once.
Sending and re-sending an invitation need an active subscription, because both add a seat and send mail from our domain; revoking an invitation and removing someone never do, so access can always be pulled. Outbound email is not yet release-certified, so if an invitation has not arrived, check the junk folder and re-send it rather than assuming it was accepted.
9. Settings
The Settings tab is home to everything about your organization and your account.
Organization
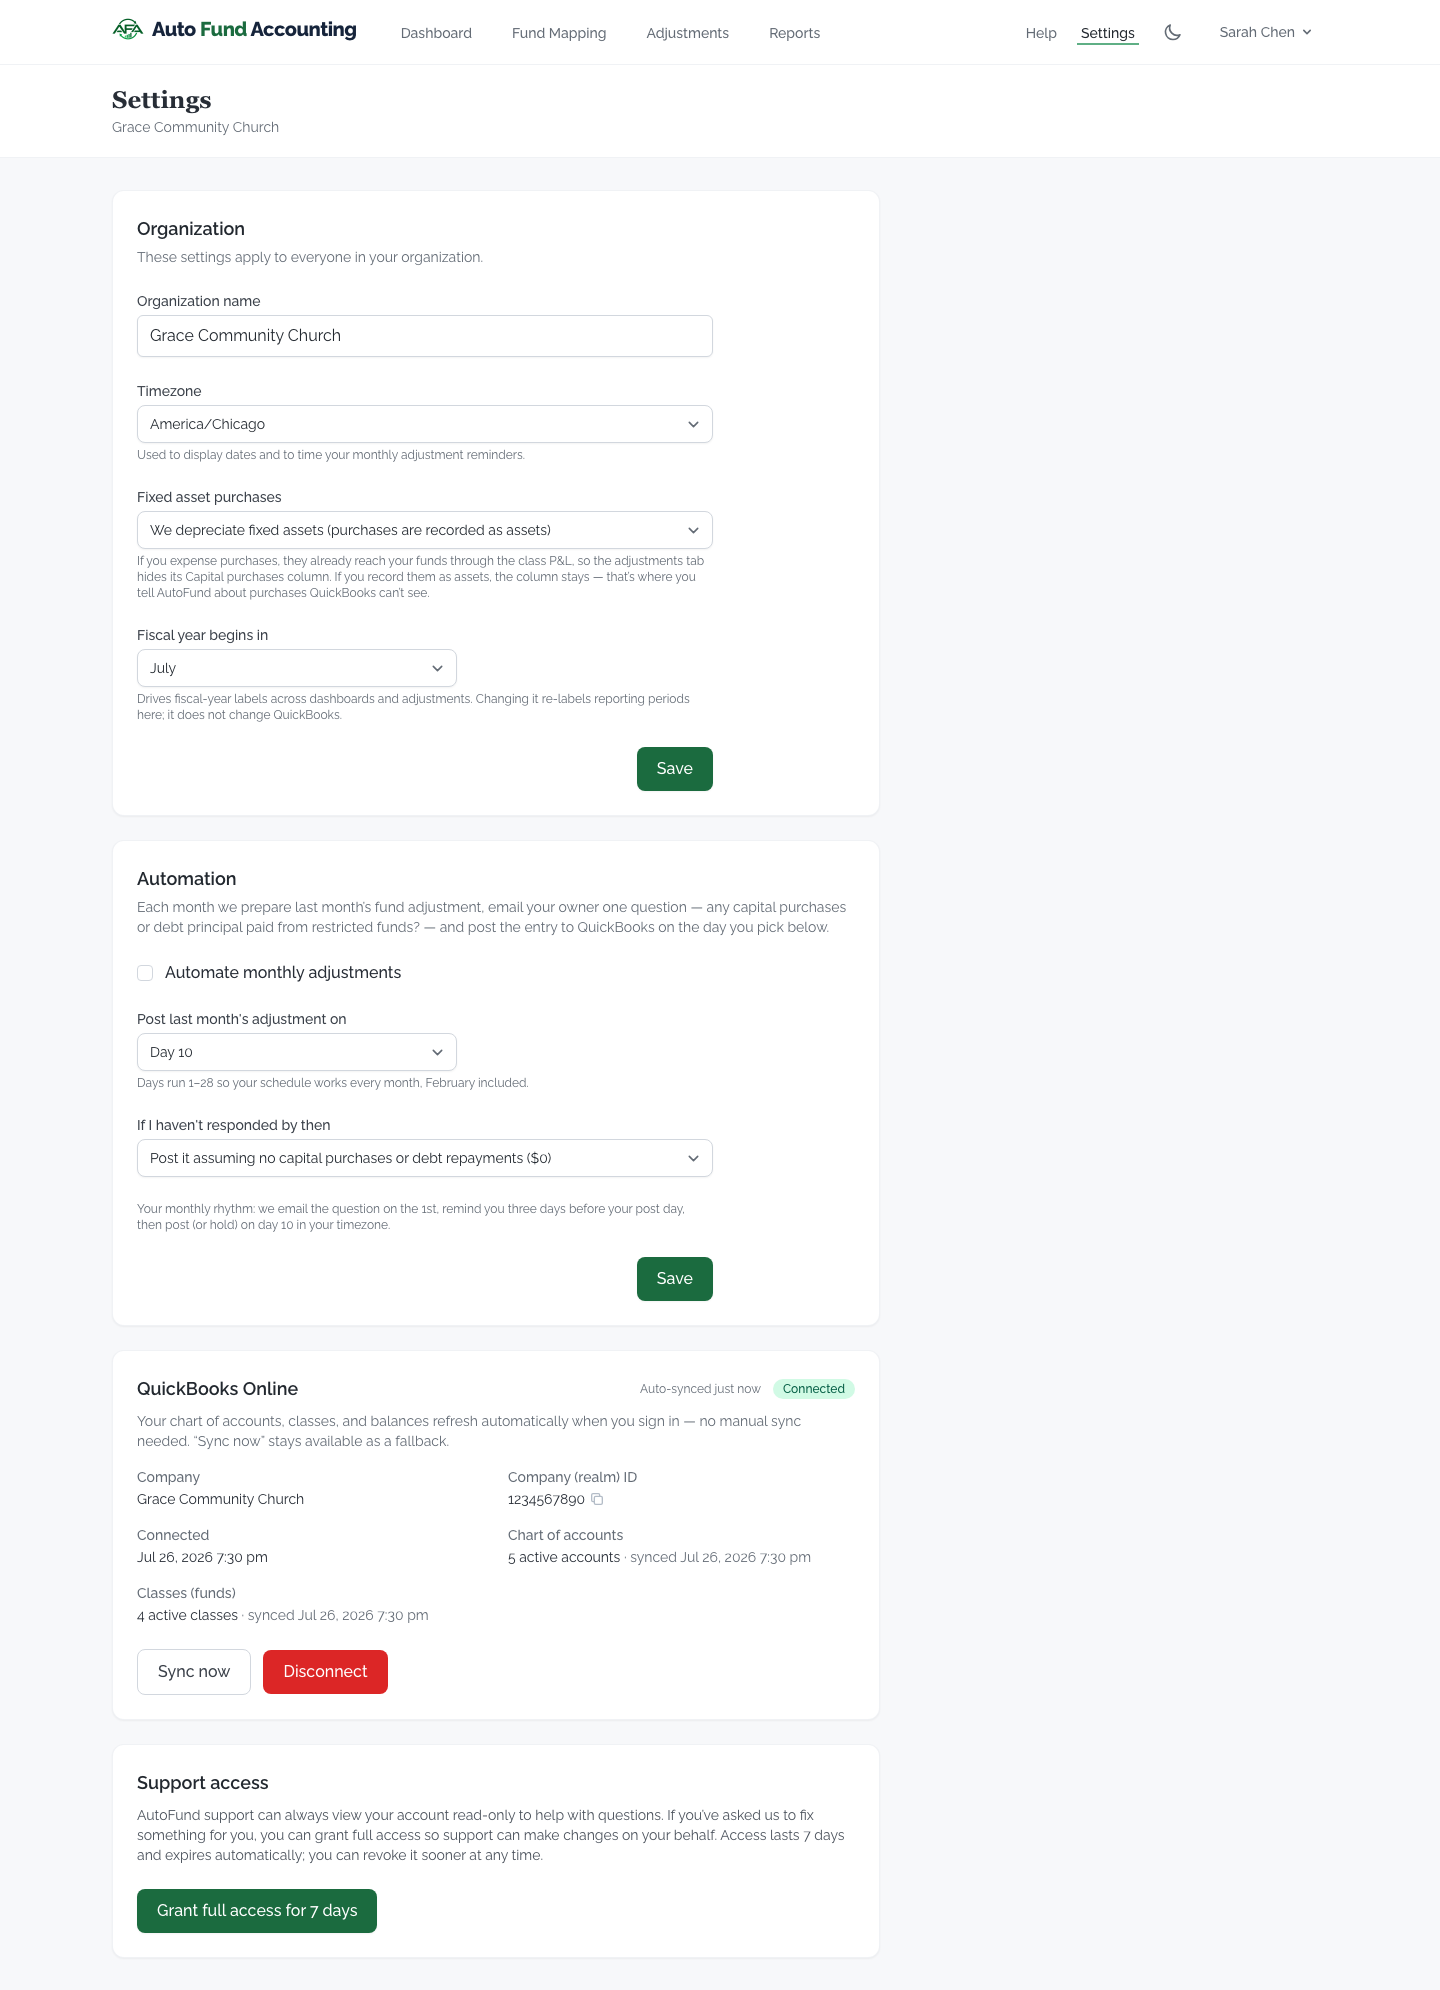
- Your organization's name, time zone, and fiscal-year start owner only.
- Whether you depreciate or expense fixed assets — this controls the Capital purchases input on adjustments (see "Your monthly adjustments") owner only.
Organization logo
Add your organization's logo Administrator only and it appears on your shared report links and on Excel and PDF exports. Upload a PNG or JPEG of up to 2 MB; larger images are scaled down to fit 600 × 200 pixels. Settings previews the logo on a light and a dark background so you can check it reads on both. You can replace or remove it any time. Administrators are also offered this once, in a short pop-up after setup.
QuickBooks connection
See whether QuickBooks is connected and sync your chart and classes on demand Administrator or Supervisor. Administrators and Supervisors can perform this action. Associates have read-only access to these financial controls.
Disconnecting QuickBooks
Once setup is finished, Disconnect QuickBooks Administrator only closes your AutoFund account. It ends your subscription, everyone in your organization loses access, and your organization's AutoFund data is scheduled for deletion after 30 days. AutoFund Accounting does not offer refunds, including for unused time. Your QuickBooks data is not changed.
You choose when: at the end of your current term (full access until then, and you can undo it before that date) or now. A four-step confirmation asks you to agree to each consequence and to type your organization's name.
Set something up wrong? Don't disconnect. Open Support from the Help page and we'll help fix it. If the account was closed by mistake, contact support within the 30 days and we can reopen it.
While you are still setting up, and for QuickBooks Desktop, Administrators and Supervisors can still disconnect to connect a different company. That does not close anything.
Automation & support access
When your connector supports automated runs, an owner chooses the monthly posting day and whether missing inputs hold for review or count as zero. Owners can also grant support full access for seven days and revoke it sooner; without a grant, support remains read-only.
Your profile & appearance
Update your own name, email, and password from your profile. You can switch between light and dark mode any time using the toggle in the navigation bar — your choice is remembered.
10. Help & account
Help contains this printable guide, the fund-accounting guide, a support-request form, and a feature-request form. Include the screen, period, expected result, and visible error. Never include passwords, connector tokens, payment details, or signed support URLs.
Your profile controls your own name, email, password, appearance, and account deletion. Password and deletion actions require confirmation. Export anything you must retain and contact support before deletion when ownership or retention is uncertain.
11. Billing
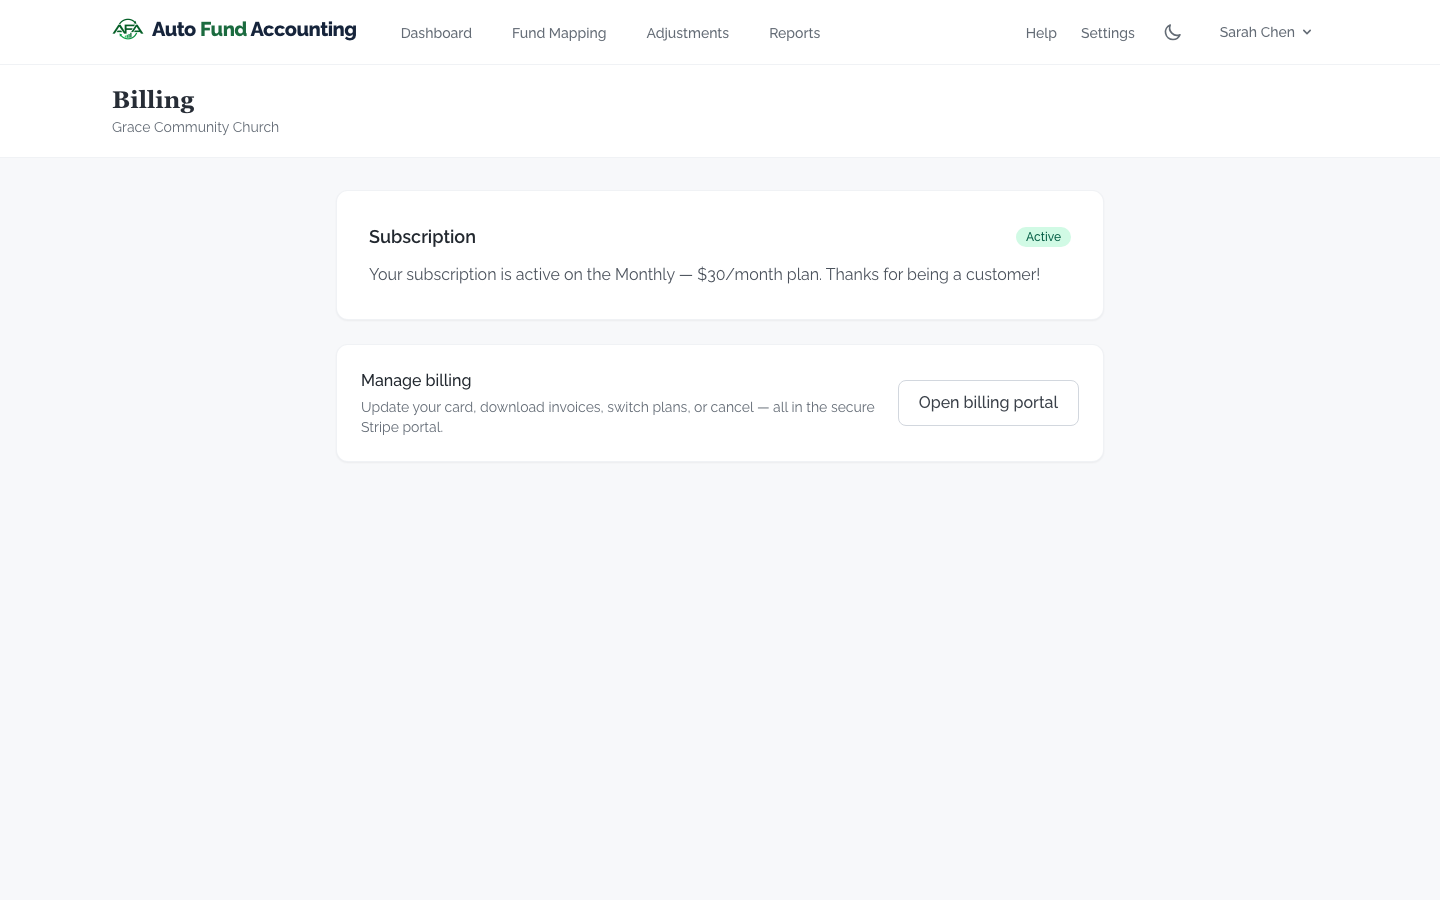
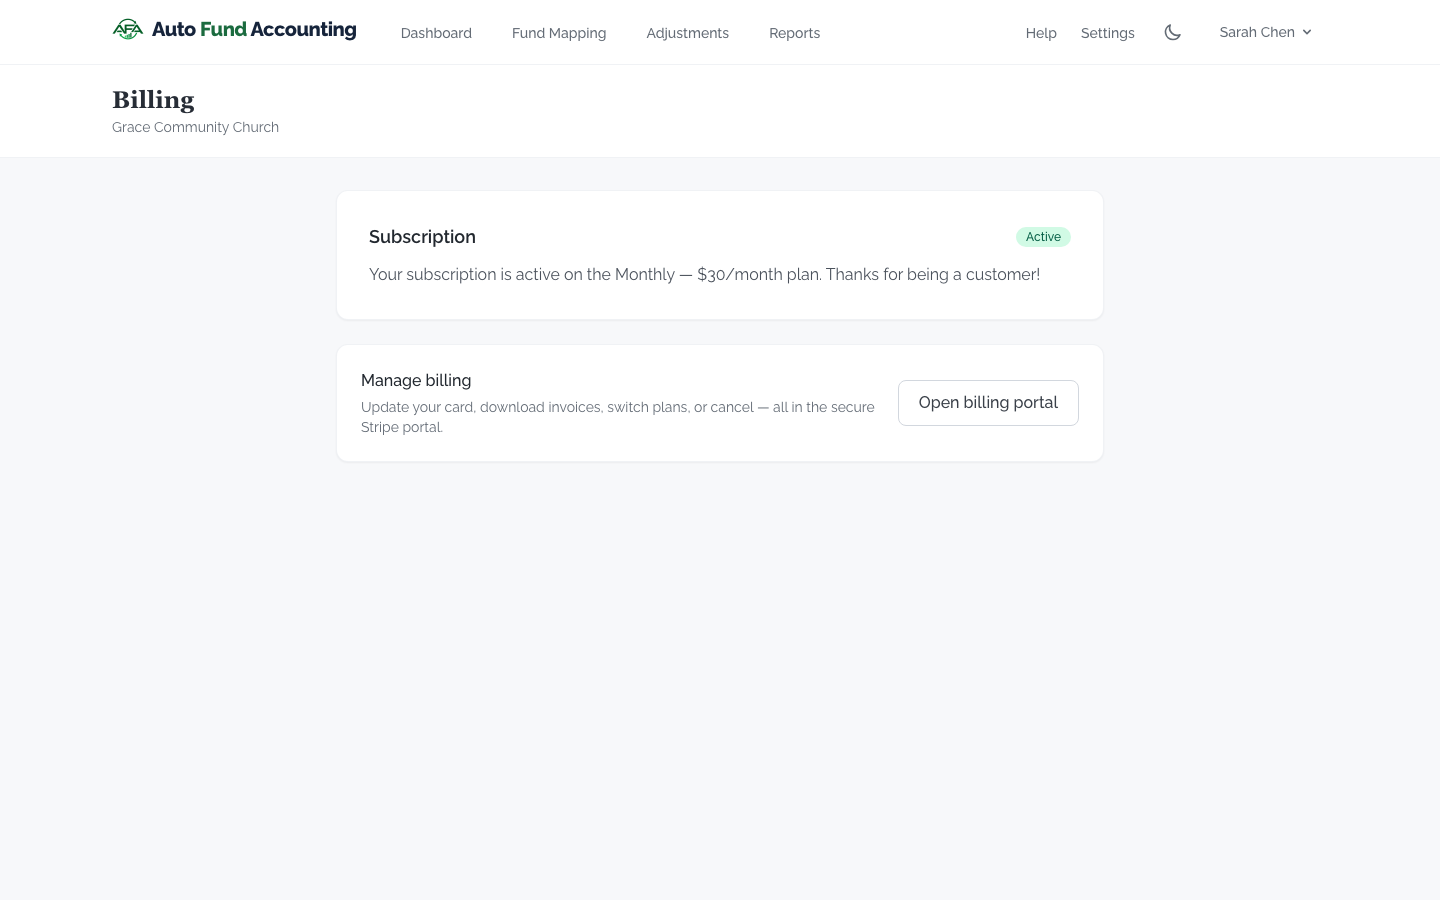
The Billing tab shows your current plan and subscription status, and it's how you make any billing change.
- Switch plans between monthly and annual owner only.
- Update your payment method through Stripe's secure billing portal owner only — your card details stay with Stripe.
- Download your invoices and receipts.
12. Canceling
You can cancel any time from Billing owner only. There's no cancellation fee and no lock-in.
Your grace period
When you cancel, your subscription stays active through the end of the period you've already paid for — you keep full access until then. After that, the app locks to your Billing page (where you can resubscribe). Canceling on its own doesn't delete anything.
Disconnecting QuickBooks closes your account
Canceling from Billing only ends your subscription. Disconnect QuickBooks in Settings Administrator only goes further: it ends the subscription, closes your AutoFund account so nobody in your organization can use it, and schedules your organization's AutoFund data for deletion after 30 days. AutoFund Accounting does not offer refunds, including for unused time. You can choose to disconnect at the end of your current term (and undo it until then) or right away. If you close the account by mistake, contact support within those 30 days and we can reopen it.
What happens to your QuickBooks data
Nothing changes in QuickBooks. Every journal entry AutoFund posted is a normal entry in your books — canceling doesn't remove or alter them. Your funds stay exactly as they were the last time you posted an adjustment.
Coming back
Resubscribe from Billing when that provider flow is certified. The application does not delete the organization or fund mapping merely because a subscription lapses; connector credentials may still need reauthorization before work resumes.
If you want your data deleted
Canceling and deleting are different requests. To have your account data deleted, ask us at Help → Contact support — we verify the request before acting on it, and the Privacy Policy says what we delete and what we're required to keep. One thing worth knowing before you ask: deleted data can remain in our encrypted backups until those backups expire, and if we ever restore from one, we put the deletion back into effect before the app comes back up.
13. Failure & recovery
- For a stalled connection, use the displayed check/retry action once; sign in again if the session expired.
- For stale dashboard, report, or ledger data, preserve the timestamp and use one read-only Refresh.
- Rebuild a stale adjustment; never bypass the stale guard.
- After a failed or ambiguous push/reclassification, do not repeat the write. Reconcile in QuickBooks and contact support first.
- Use Billing for payment-due or lapsed access; do not create a replacement organization.
14. Release limitations
A visible screen is not the same as release certification. Live connector operations, Stripe billing, outbound email, and disaster recovery remain subject to the current release evidence. QuickBooks Desktop/Web Connector is not available for public use. Referrals are deferred and intentionally absent from this guide.